


Last Updated on July 11, 2025
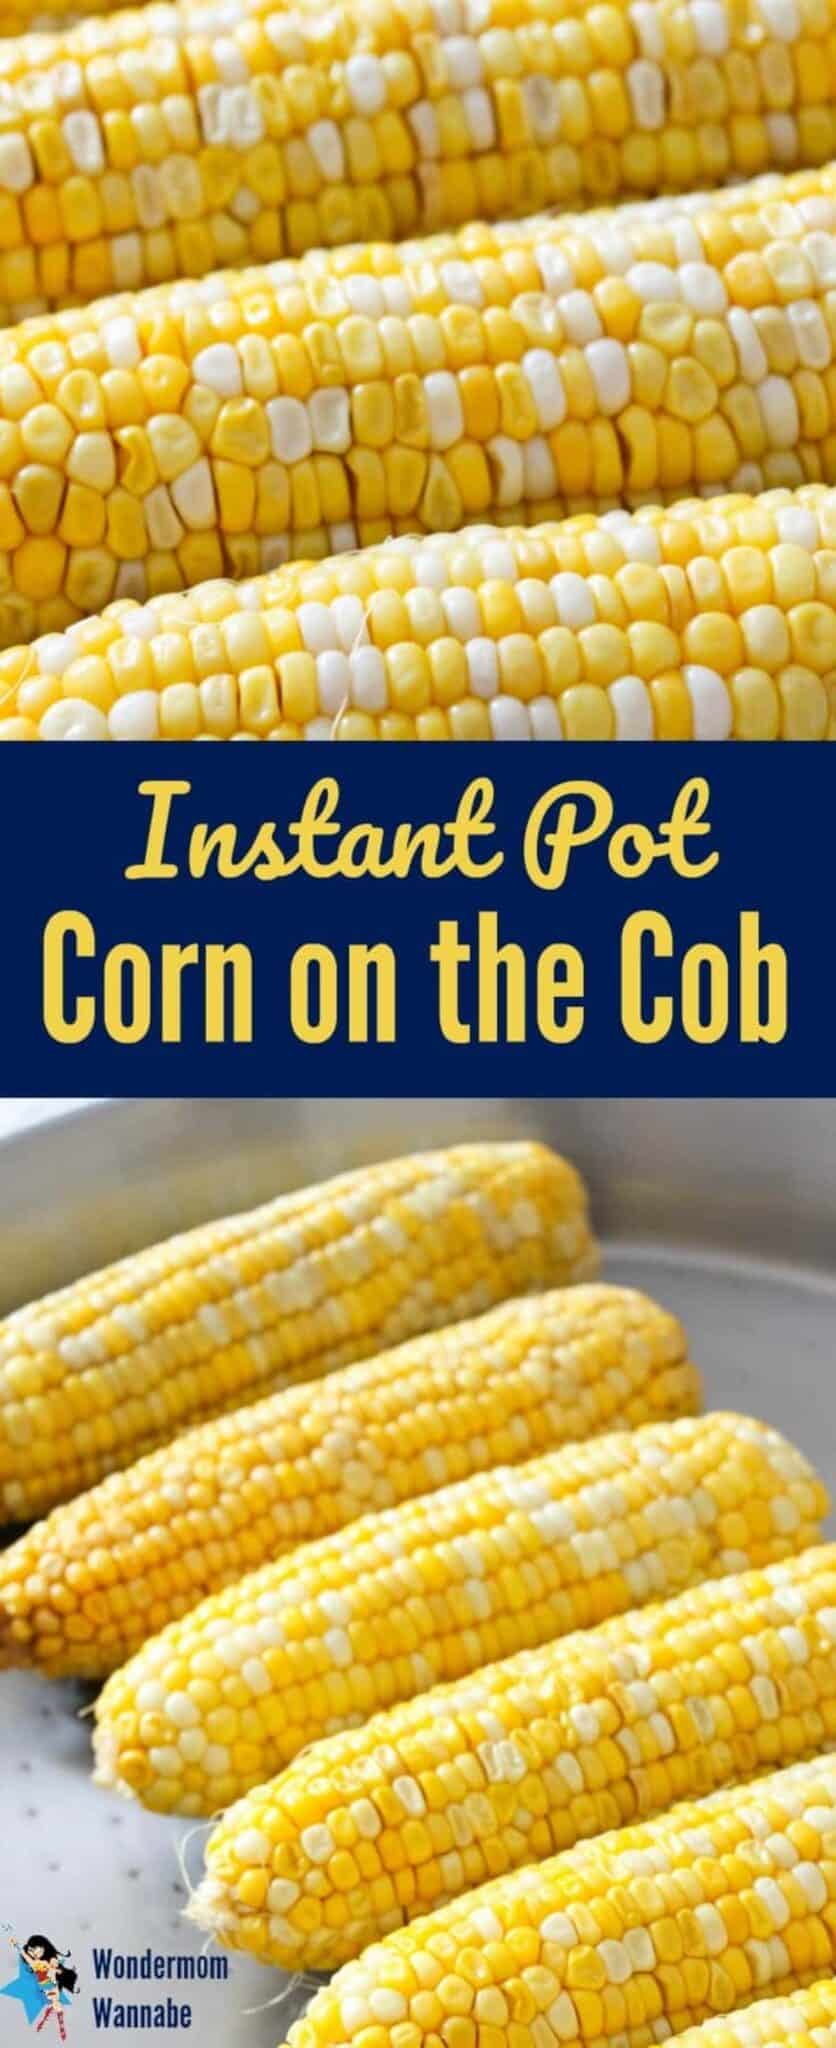
Instant Pot Corn on the Cob is one of the easiest crowd-pleasing side dishes you can make.

The great thing about making it in the Instant Pot is that it’s easy to infuse the corn with that classic creamy, buttery flavor right inside the pot. You can bet you won't hear any dinner complaints when a big platter of buttery corn on the cob is served.
Plus, corn on the cob is so much fun to eat-kids especially love any chance they get to eat with their hands, and adults can't help but smile when they see corn on the table. Whether you're planning a backyard barbecue with grilled chicken, a weeknight dinner, or a holiday gathering, corn on the cob is always a hit.
Jump to:
- Why Make Corn on the Cob in the Instant Pot?
- SAVE THIS RECIPE!
- ❤️ Why You’ll Love This Recipe
- 🥘 Ingredients
- 🌈 Variations / Options / Add-Ins
- 🥄 Equipment Needed / Helpful Tools
- Tired of Ads?
- 🔪 How to Make Instant Pot Corn on the Cob
- 👩🍳 Pro Tips
- ❓ Recipe FAQs
- 🙏 Pairing
- SAVE THIS RECIPE!
- 📋 Recipe
- Pro Tips
- Recipe FAQs
- More Instant Pot Resources
Why Make Corn on the Cob in the Instant Pot?
Before I answer that question, I want to make sure you have all of the information first-if you’re new to Instant Pot cooking, you might be under the mistaken impression that it cooks things INSTANTLY. When you look at the recipe below, you’ll see the “cook time” is only two minutes.
I don’t want to discourage you, but I do want to prepare you for what will really happen. The Instant Pot is a pressure cooker so it will take several minutes to come to pressure BEFORE the cook time begins.
Then, after the two minute cook time, the pressure will need to release. That will be several more minutes.
You’re probably thinking to yourself, “It’s going to take just as long as if I boiled the cobs on the stove or baked them in the oven.” And you’re right! So why would you want to make them in the Instant Pot?
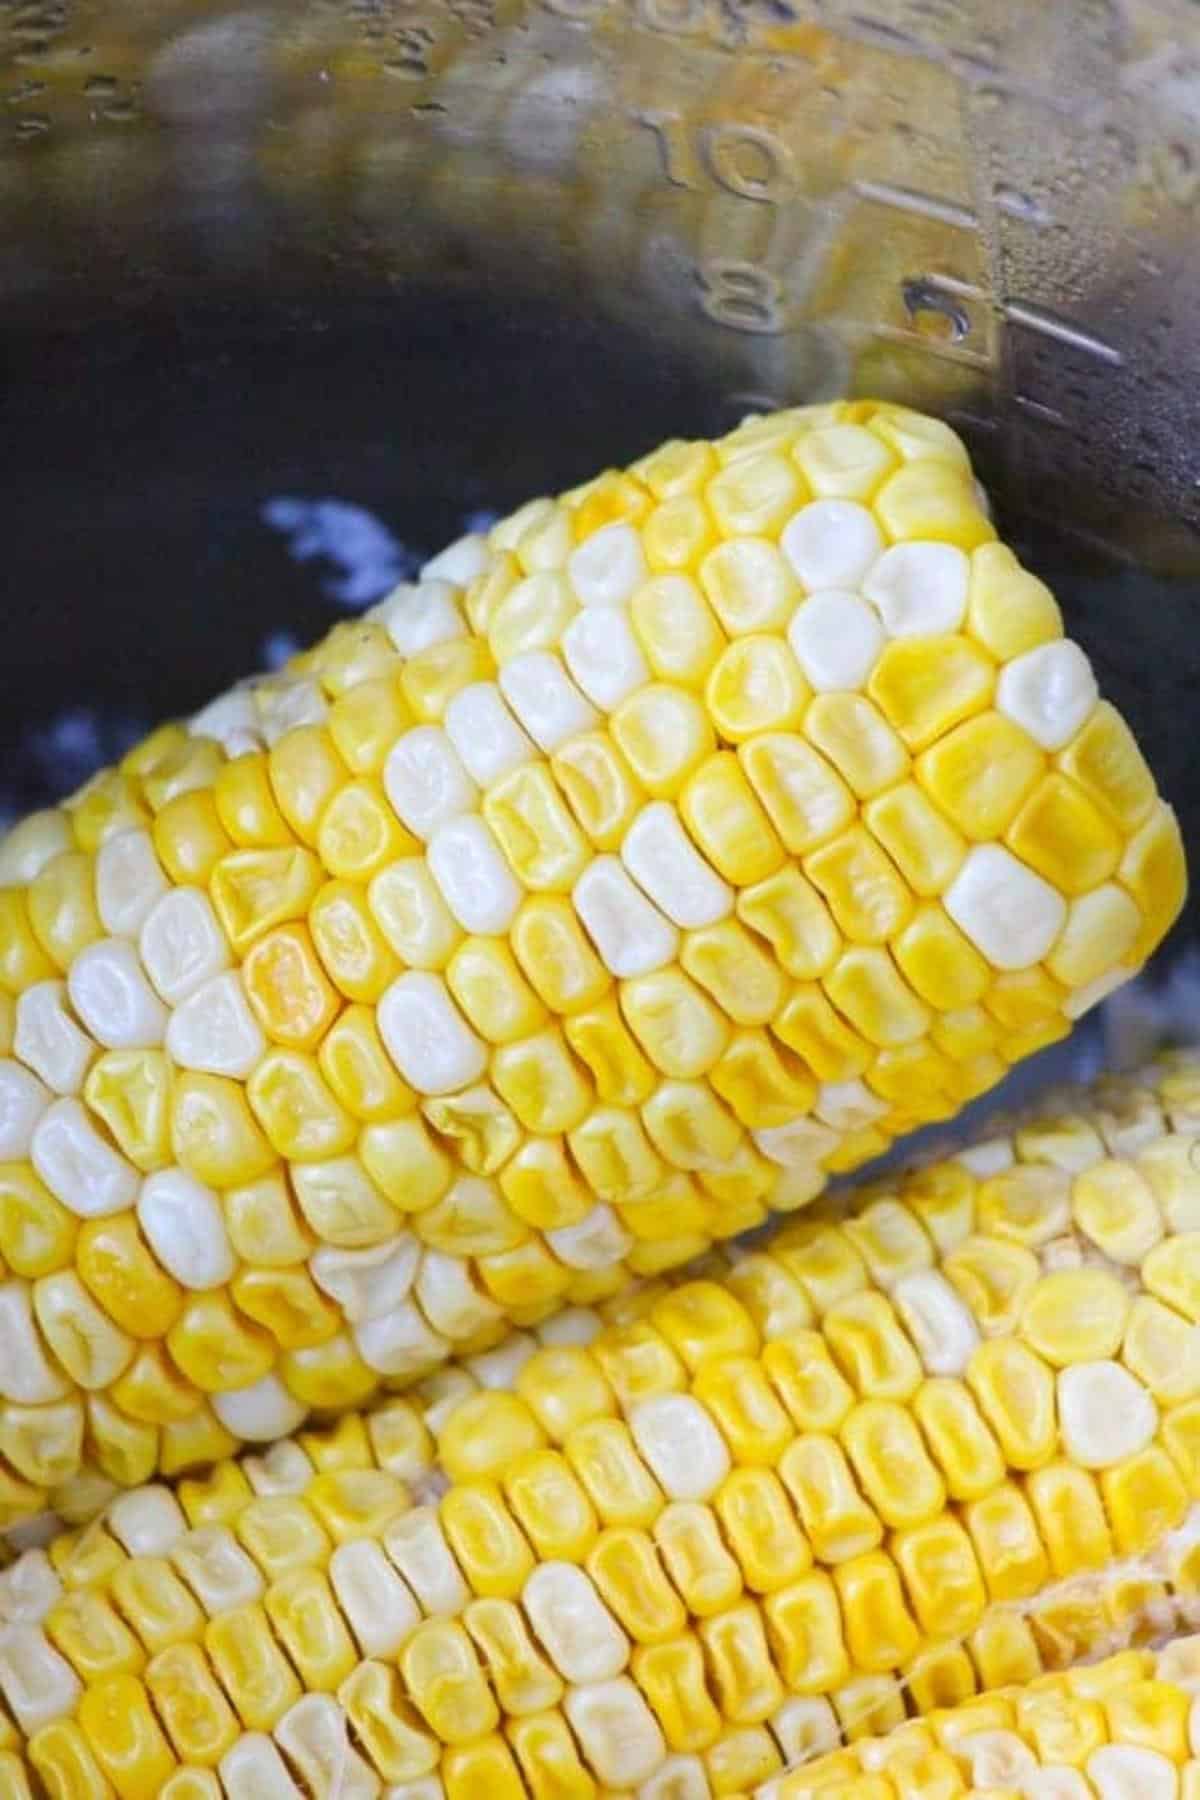
- Flavor: Because the corn is going to cook under pressure, anything you add to the pot for flavor (like butter) is going to get forced deep within the corn.
- Comfort: Unlike the oven, the Instant Pot won’t heat up your house.
- Convenience: You don’t have to tend a pot of water waiting for it to boil before adding the corn-you just put everything in the pot and walk away until it’s ready.
- Safety: The Instant Pot’s sealed environment reduces the risk of spills and burns associated with boiling water.
SAVE THIS RECIPE!
Enter your email below and I’ll send it straight to your inbox.
❤️ Why You’ll Love This Recipe
This side dish recipe is an easy crowd-pleasing recipe that’s perfect for summer.
- Ready in under 30 minutes: This recipe will be done in about 25 minutes. This includes the time needed for prep, pressurizing, cooking and natural release.
- Easy to make: It’s so easy to make corn on the cob. You just have to remove the husks, add a few ingredients to the pot and let it cook.
- Perfect for picky eaters: If you’re having a party and you’re not sure what to make that everyone will like, this is definitely the answer. There's something nostalgic and summery about biting into sweet, juicy kernels that everyone loves.
If you want to try another delicious recipe made with corn, try this sweet corn and watermelon salad.
🥘 Ingredients
To make this delicious corn you will need a few simple ingredients. You probably have all of the ingredients other than the corn, which is easy to find at your local grocery store and often on sale this time of year.
- Ears of corn: This is also known as corn on the cob, in case you’re more familiar with that term. When choosing this at the store, peel back a small part of the husk at the top and make sure the kernels look full all the way up to the tip.
- Milk: You can use any type of milk you have on hand. It helps the corn have a rich flavor and makes it extra tender and juicy.
- Butter: You can use regular salted butter or if you prefer to control the salt yourself, use unsalted butter and season the corn later. This is what gives the corn that ultra-creamy, rich flavor.
See recipe card for complete list of ingredients and quantities
🌈 Variations / Options / Add-Ins
Here are a few ways that you can personalize this simple side recipe.
- Add Herbs or Garlic: Add fresh herbs like rosemary, thyme, or parsley to the milk and butter mixture for a fragrant, savory twist. You can also toss in a few smashed garlic cloves while cooking to infuse the corn with a mild garlic flavor.
- Cheesy Corn: After cooking, sprinkle the corn with grated Parmesan, cotija, or crumbled feta for a salty, creamy finish.
- Compound Butters: Serve the cooked corn with flavored butters like honey butter, chipotle butter, or garlic herb butter for extra flavor.
You can also grill corn on the cob and use it to make this grilled corn salad with shrimp.
🥄 Equipment Needed / Helpful Tools
You only need a few kitchen tools to help you make this simple dinner. Gather these tools and get ready to enjoy this tasty dish.
- Instant Pot (6-quart or 8-quart): This is where you'll do all of the cooking for this recipe. A 6-quart Instant Pot works well, but you can also use an 8-quart if you're making more corn.
- Tongs: These make it easy (and safer!) to remove the hot corn from the Instant Pot.
- Corn holders (optional): The corn will be easier to hold for kids and the adults if you use these.
Tired of Ads?
Skip the distractions and get straight to the good stuff with Wonder Mom Premium!
As a member, you'll enjoy:
✅ Ad-free browsing for a seamless recipe experience
✅ Printable kitchen guides & meal-planning tools
✅ Exclusive discounts & members-only freebies
Join today and make cooking stress-free!
🔪 How to Make Instant Pot Corn on the Cob
Follow these simple steps to enjoy sweet, flavorful corn on the cob with hardly any effort.
Would you like to save this?
Step 1: Add Water, Milk and Butter
Add the water, milk and butter to the bottom of the Instant Pot.

Step 2: Prepare and Add Corn
Remove the husks from your corn and gently scrub the corn to remove the silk. Carefully add the corn cobs to the pot so you don’t splash the liquid out.
Step 3: Cook the Corn
Secure the lid, make sure the valve is on “sealing” and set to manual for two minutes. Then wait for the magic to happen.
Step 4: Natural Release
Allow the Instant Pot to natural release after it is finished cooking. Then, you can safely remove the lid and remove your flavor-infused corn cobs.
Step 5: Serve and Enjoy
The corn on the cob is ready to be served and enjoyed by your family and friends. You shouldn’t need to add more butter, unless you’re a real butter fanatic then you can certainly spread more on!

👩🍳 Pro Tips
Here are a few tips to make sure this recipe turns out perfectly every time.
- Cut the cobs in half if needed-if your corn is too long to fit in the pot, you can easily cut it in half before cooking. This also makes it easier for kids to handle.
- Don't skip the natural release. Letting the Instant Pot naturally release pressure for at least 5 minutes helps the corn finish cooking gently and keeps it extra juicy.
- While the milk and butter infuse the corn with flavor, you can also sprinkle extra salt, pepper, or any favorite spices after cooking to adjust to taste.
- If you're not serving right away, you can use the Instant Pot's "Keep Warm" setting for up to an hour. Just make sure there's still a bit of liquid so it doesn't dry out.
- The freshest corn will be the sweetest and juiciest. If you can, buy corn the same day you plan to cook it.
❓ Recipe FAQs
Yes! You can cook frozen corn on the cob directly from frozen in the Instant Pot. Just add about 1 extra minute to the cook time (so, 3 minutes total), and still do a natural release.
It depends on the size of your Instant Pot. In a 6-quart pot, you can usually fit 4-6 ears (sometimes more if you cut them in half and stack). Just make sure not to go above the "Max Fill" line.
Store leftover corn in an airtight container in the fridge for up to 3-4 days. You can reheat it in the microwave, or briefly in the Instant Pot on "Steam" with a little water.
🙏 Pairing
These are my favorite dishes to serve with Instant Pot Corn on the Cob:


Ready to get cooking? Print off the recipe card below or toggle on Cook Mode to keep your screen from going dark while you follow along on your phone or tablet.
SAVE THIS RECIPE!
Enter your email below and I’ll send it straight to your inbox.
📋 Recipe

Instant Pot Corn on the Cob
Would you like to save this?
Equipment
- Instant Pot
- Tongs
- Corn holders
Ingredients
- 4-6 ears of corn
- 1 cup milk
- 1 cup water
- 2 tablespoons butter
- salt to taste
Instructions
- Add the water, milk and butter to the bottom of the Instant Pot.1 cup milk, 1 cup water, 2 tablespoons butter
- Remove the husks from your corn and gently scrub the corn to remove the silk. Carefully add the corn cobs to the pot so you don't splash the liquid out.4-6 ears of corn
- Secure the lid, make sure the valve is on "sealing" and set to manual for two minutes.
- Allow the Instant Pot to natural release after it is finished cooking. Then, you can safely remove the lid and remove your flavor-infused corn cobs.
- The corn on the cob is ready to be served and enjoyed by your family and friends. You shouldn't need to add more butter, unless you're a real butter fanatic then you can certainly spread more on!salt
Notes
Pro Tips
- Cut the cobs in half if needed-if your corn is too long to fit in the pot, you can easily cut it in half before cooking. This also makes it easier for kids to handle.
- Don't skip the natural release. Letting the Instant Pot naturally release pressure for at least 5 minutes helps the corn finish cooking gently and keeps it extra juicy.
- While the milk and butter infuse the corn with flavor, you can also sprinkle extra salt, pepper, or any favorite spices after cooking to adjust to taste.
- If you're not serving right away, you can use the Instant Pot's "Keep Warm" setting for up to an hour. Just make sure there's still a bit of liquid so it doesn't dry out.
- The freshest corn will be the sweetest and juiciest. If you can, buy corn the same day you plan to cook it.
Recipe FAQs
Can I use frozen corn on the cob? Yes! You can cook frozen corn on the cob directly from frozen in the Instant Pot. Just add about 1 extra minute to the cook time (so, 3 minutes total), and still do a natural release. How many ears of corn can I cook at once? It depends on the size of your Instant Pot. In a 6-quart pot, you can usually fit 4–6 ears (sometimes more if you cut them in half and stack). Just make sure not to go above the “Max Fill” line. How do I store leftover corn? Store leftover corn in an airtight container in the fridge for up to 3–4 days. You can reheat it in the microwave, or briefly in the Instant Pot on “Steam” with a little water.Nutrition
More Instant Pot Resources
Love your Instant Pot? Find more Instant Pot Recipes here. And check out my favorite Instant Pot Hacks.

This was my first time making corn on the cob in my IP. It was amazing! I won’t even try another recipe as this was so good!
How long does it take for natural release?
It depends on the size of your pot and how much corn you are making. Typically around 10 minutes though.
This turned out really delicious and very easy to make!
I made the corn on the cob using the milk and the milk curdled. Would like another tasteful recipe not requiring milk.
Hi Nina, thanks for the feedback. I’ll work on a different version.