


Last Updated on March 19, 2025
Easter Oreo Chicks are adorable yellow treats made with store-bought Oreo cookies that will delight children and only takes minutes to make.

Everything seems to taste better if it’s coated in something else-carrots in ranch, fish sticks in tartar sauce, cookies in candy melts, etc. If you and your family can relate to this, you should try this other fun treat, Easter chocolate covered strawberries.
These cute Easter cookies work great bagged in individual cellophane bags and tied with ribbons. They can be handed out at school celebrations or church functions.
Jump to:
- Why are Baby Chicks a Popular Gift at Easter?
- SAVE THIS RECIPE!
- ❤️ Why You’ll Love This Recipe
- 🥘 Ingredients
- 🔀 Substitutions
- 🌈Variations / Options / Add-Ins
- 🥄 Equipment Needed / Helpful Tools
- Tired of Ads?
- 🔪 How to Make Easter Oreo Chicks
- 👩🍳 Pro Tips
- ❓ Recipe FAQs
- 🙏 Pairing
- SAVE THIS RECIPE!
- 📋 Recipe
- Pro Tips
- Recipe FAQs
Why are Baby Chicks a Popular Gift at Easter?
Baby chicks are popular at Easter because chicks hatching from eggs are a visual representation of new life and rebirth, which goes along with the message of the Christian celebration of Jesus’ resurrection and also with the arrival of spring, a season of new beginnings.
People even used to dye chicks, just like they dye eggs to go along with the Easter celebration. Of course, this made kids want the brightly colored chicks because they were cute and seemed like something fun to play with, so kids were often gifted a chick in their Easter basket.
However, this often becomes a problem because people don’t usually have all of the supplies needed to take care of the baby chick. Plus, of course the chick turns into a chicken, and people really aren’t prepared for all of the work they require, so they abandon them, rather than re-homing them.
Personally, I don’t like the concept of giving children live baby chicks in an Easter basket, especially because of the ethical issues mentioned above. Instead, it is much simpler to just make some cookies that look like baby chicks and there is a lot less to clean up after!
Luckily, these Easter Oreo Cookies are totally harmless to everything except maybe my waistline, LOL.
SAVE THIS RECIPE!
Enter your email below and I’ll send it straight to your inbox.
❤️ Why You’ll Love This Recipe
These cute Easter Oreo Chicks will make your kids so happy on this special holiday.
- Easy to make: All you basically have to do is melt the candy, coat the cookies and decorate. Your kids can help you with most or all of the steps depending on their age.
- Fun to make: Since your kids can help you make these, you can have fun making memories by creating an assembly line and playing some Easter songs as you assemble these for your friends and family.
- Looks cute on a plate: Something about baby chicks is so cute, and even though these are just cookies and not the real thing, they still look just as cute.
For some more cute treats, try these Easter cake mix cookies.
🥘 Ingredients
What could be better than making adorable treats that only call for a few ingredients? These cute little Easter cookies only require two main ingredients plus the items for the baby chick’s face.
- Double Stuf Oreo cookies: These are the base of the treat. You can use any flavor you prefer.
- Yellow candy melts: This is what you’ll dip the cookies in to coat them.
- Yellow sparkling sugar sprinkles: It gives the cookies a sparkly, textured appearance that mimics fluffy chick feathers.
- Mini chocolate chips: Use two for each chick’s eyes. You can use any brand you prefer.
- Orange and yellow mini M&M candies: One orange on each chick is for the beak and the two yellow on each chick is for the wings.
See recipe card for complete list of ingredients and quantities.
🔀 Substitutions
If you don't have the ingredients you need, see if you have these instead:
Double Stuf Oreo Cookies: You can use regular Oreos instead of Double Stuf (but the thicker filling helps hold the decorations better). Also, if you prefer the Golden Oreos, those would work as well.
Yellow candy melts: White chocolate chips plus yellow oil-based food coloring with 1 teaspoon of coconut oil to thin it would work instead. You could also use white almond bark plus yellow oil-based food coloring.
Yellow sparkling sugar sprinkles: Yellow sanding sugar would work also, although it has smaller crystals, but it’s still sparkly. You could also just leave these off-the chick will still look cute with just a smooth coating.
Mini chocolate chips: Use candy eyes, pipe small dots of black gel icing, or even brown mini M&Ms instead.
Orange and yellow mini M&M candies: Orange and yellow Starbursts cut into tiny triangles would work instead, or even orange and yellow jelly beans cut in half.
🌈Variations / Options / Add-Ins
These holiday cookies can easily be customized to fit your personal tastes.
Color Variations: You don’t have to make only yellow “chicks,” you can make pink chicks using pink candy melts and pink sparkling sugar or even blue chicks using blue candy melts and blue sugar. For more pastel varieties, you can even use lavender candy melts and lavender sugar.
Flavor variations: For coconut chick Oreos, mix shredded coconut into the yellow sugar for an additional flavor and a fluffier feathered look. If you like lemon, use Golden Oreos and add a few drops of lemon extract to the candy melts.
Additional decorations: Place each coated Oreo on a “nest” of toasted coconut flakes or crushed pretzels. For a speckled chick look, after dipping, splatter melted chocolate or colored cocoa butter for a speckled egg effect.
If you want cookies that are for the Easter bunny, try these carrot sugar cookies.
🥄 Equipment Needed / Helpful Tools
You only need a few kitchen tools to help you make this easy recipe. So, gather these tools and get ready to enjoy this tasty dessert.
- Baking sheet: This is where you'll assemble the treats.
- Wax paper: Put this on the baking sheet before you make the snack so clean up is really easy when you're done.
- Microwave safe bowl: You'll need a bowl to melt the yellow candy melts.
- Candy dipping scoop: This will make it easier to remove the cookie from the melted candy.
Tired of Ads?
Skip the distractions and get straight to the good stuff with Wonder Mom Premium!
As a member, you’ll enjoy:
✅ Ad-free browsing for a seamless recipe experience
✅ Printable kitchen guides & meal-planning tools
✅ Exclusive discounts & members-only freebies
Join today and make cooking stress-free!
🔪 How to Make Easter Oreo Chicks
These cookies are easy to make, so your kids will enjoy helping you make these baby chicks. All you have to do is follow these simple instructions-no baking required.
Step 1: Prepare Baking Sheet
Start off by lining a baking sheet with waxed paper. This will keep the cookies from sticking to the pan later, making clean up easier.
Step 2: Melt Candy
Place the yellow candy melts into a microwave-safe bowl and melt according to the package directions.
You want to be able to pour the melted candy, so if it’s too thick after melting it, just add 1 teaspoon of coconut oil or vegetable shortening. Stir it well.
It is okay to add up to 1 tablespoon of oil per bag of candy melts as needed, however do not add water.
Step 3: Coat the Cookie
Drop one Oreo cookie at a time into the melted candy. Turn it over to coat it completely.
Remove the cookie from the candy using a candy dipping scoop, tapping gently on the side of the bowl so the excess can drip off into the bowl.
Lay the coated cookie down on the lined baking sheet. If there are any air bubbles in the coating, just pop them with a toothpick.
Step 4: Decorate
Go ahead and immediately create the chick face before the candy coating hardens.
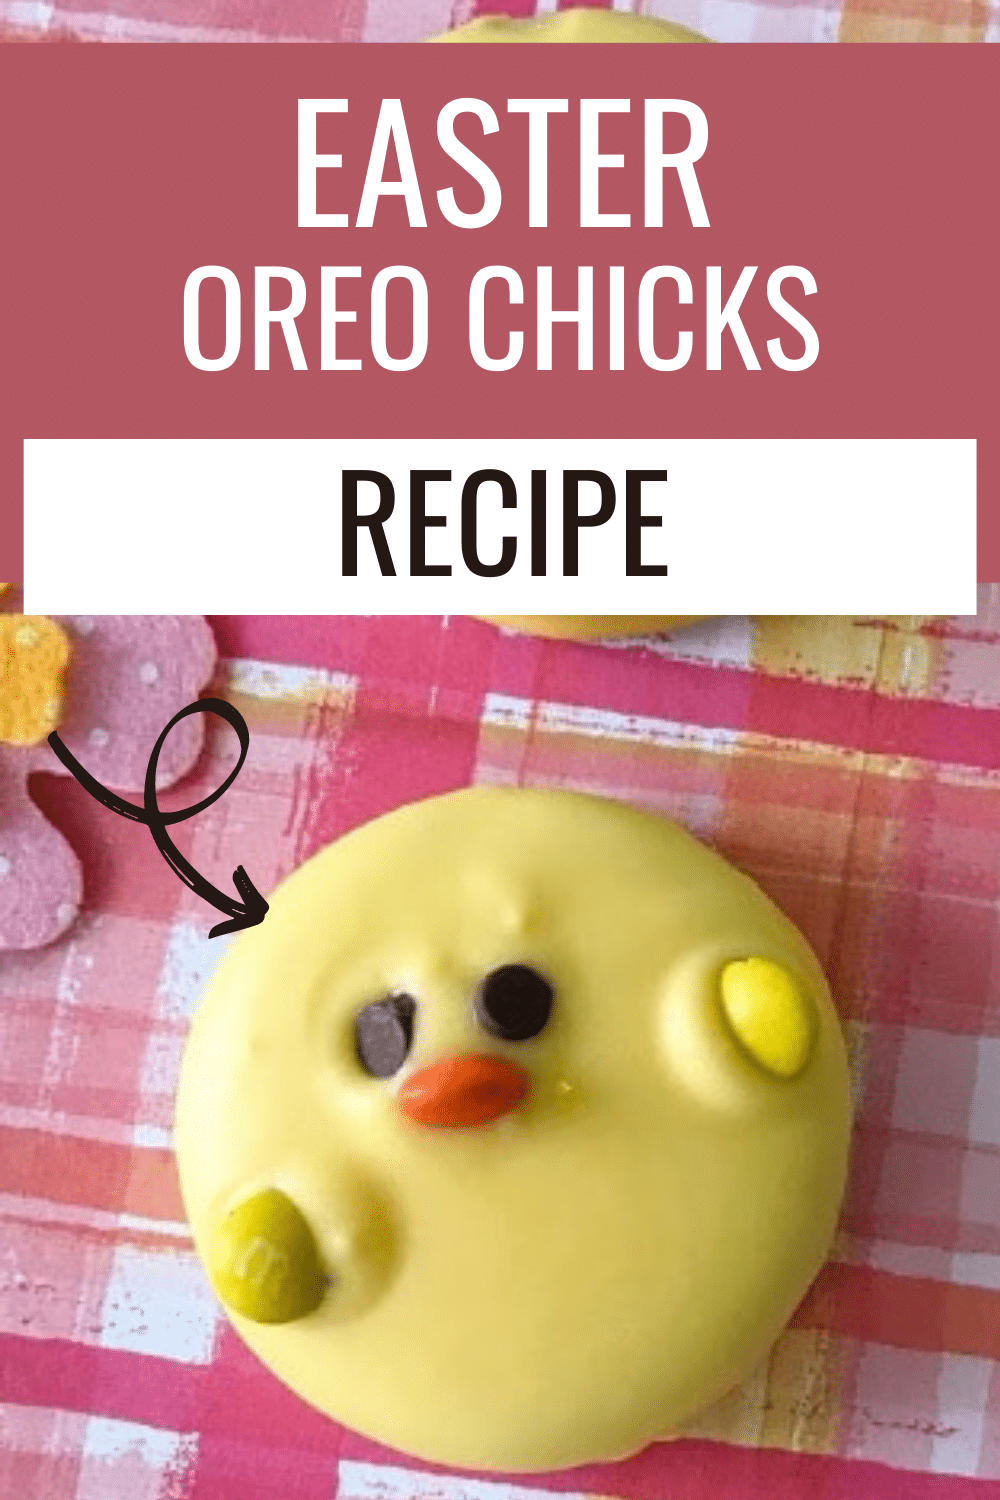
Add 2 mini chocolate chips for eyes, one orange mini M&M candy for the beak and 2 yellow mini M&M candies for little wings.
Sprinkle the cookie with the yellow sparkling sugar and allow the cookie to harden.

Step 5: Repeat
Repeat the above steps to make all the baby chick cookies.
Step 6: Set, then Serve and Enjoy
Allow all the cookies to set up at room temperature for about 30 minutes or place the baking sheet in the refrigerator to set for 10-15 minutes if you are in a hurry.
Store cookies in an airtight container at room temperature until ready to serve and enjoy.

👩🍳 Pro Tips
Here are a few tips that you can use to make sure that your Easter Oreo Chicks turn out perfectly.
- Work in small batches and reheat the melts if they start to harden. A mug warmer or double boiler helps keep it smooth.
- Use tweezers or a toothpick to help place tiny decorations like mini M&Ms or chocolate chips perfectly.
- It’s important to let them set fully before you move or stack the cookies so that the coating is completely firm so the decorations won’t slide around.
❓ Recipe FAQs
Yes! Make them a few days in advance and store them in a cool, dry place.
They stay fresh for up to a week at room temperature in an airtight container or up to 2 weeks in the fridge.
Yes! Freeze in a single layer, then transfer to an airtight container for up to 3 months. Thaw at room temperature before serving.
🙏 Pairing
These are my favorite dishes to serve with Easter Oreo Chicks:


Ready to get cooking? Print off the recipe card below or toggle on Cook Mode to keep your screen from going dark while you follow along on your phone or tablet.
SAVE THIS RECIPE!
Enter your email below and I’ll send it straight to your inbox.
📋 Recipe

Easter Oreo Chicks
Would you like to save this?
Equipment
- Baking sheet
- Wax paper
- Microwave safe bowl
- Candy dipping scoop
Ingredients
- 15.35 ounces Double Stuf Oreo chocolate sandwich cookies
- 2 bags yellow candy melts 12 ounce bags
To decorate:
- yellow sparkling sugar sprinkles
- 1 bag mini chocolate chips
- orange and yellow Mini M&M candies
Instructions
- Line a baking sheet with waxed paper.
- Melt candy coating according to package directions. If the candy is too thick to pour, add 1 teaspoon coconut oil or vegetable shortening. Stir well. Do not add water. You can add up to 1 tablespoon of coconut oil per bag of candy melts.2 bags yellow candy melts
- Drop one cookie into melted candy and turn to coat completely. Remove cookie from candy with candy dipping scoop, tapping gently against the side of the bowl so the excess can drip off into the bowl. Lay the coated cookie down on the lined baking sheet. If air bubbles form, pop them with a toothpick.15.35 ounces Double Stuf Oreo chocolate sandwich cookies
- Immediately create the chick face before the candy coating hardens. Add 2 mini chocolate chips for eyes, one orange mini M&M candy for the beak and 2 yellow mini M&M candies for little wings. Sprinkle the cookie with the yellow sparkling sugar and allow the cookie to harden.yellow sparkling sugar sprinkles, 1 bag mini chocolate chips, orange and yellow Mini M&M candies
- Repeat the above steps to make all the baby chick cookies.
- Allow all the cookies to set up at room temperature for about 30 minutes or place the baking sheet in the refrigerator to set for 10-15 minutes if you are in a hurry. Store cookies in an airtight container at room temperature until ready to serve and enjoy.
Notes
Pro Tips
- Work in small batches and reheat the melts if they start to harden. A mug warmer or double boiler helps keep it smooth.
- Use tweezers or a toothpick to help place tiny decorations like mini M&Ms or chocolate chips perfectly.
- It's important to let them set fully before you move or stack the cookies so that the coating is completely firm so the decorations won't slide around.